The ISFER Workbench Lab Work
IMPORTANT NOTICE: this is the old manual. The software has been updated
and the manual has changed accordingly. You can find the new course material
on Black Board. The course number is
in4017.
The ISFER workbench is a graphical toolkit for experimenting with methods
for analyzing facial expressions. Based on a dataflow-like idea, you connect
modules with specific functions in a visual interface to form a network that
performs the desired task on a set of pictures. The goal of this exercise it
to give a short introduction in ISFER, how image analysis tools work and
what ISFER can and cannot do, and write a small report about the results.
Using the workbench
Starting
The ISFER software runs on our UNIX network (the SUN workstations). You will
need an account for this, provided by the UNIX administrator. Once you are
logged in, you should be able to start it from the start menu on the
taskbar. You can also start it from a shell (xterm) with the command
startisfer.
When you run the workbench, you get three windows. First, topleft, a main
window, containing a menu and shortcut buttons for the most used actions.
Second, on the right, a view window, showing the network structure. Last,
bottomleft, a message window, showing error and debugging messages.
Building networks
 You can add modules to the network with
the buttons in the main window, the Module menu options or by
right-clicking on an empty spot in the View area. Modules are always
created in the same spot, so if you add another module without moving
the previously added module, the new module will be hidden behind the
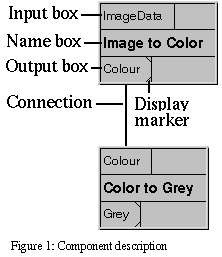
other. You can move a module by dragging it by it's namebox. Figure
1 shows a simple annotated network that converts an image to a
greyscale image.
You can add modules to the network with
the buttons in the main window, the Module menu options or by
right-clicking on an empty spot in the View area. Modules are always
created in the same spot, so if you add another module without moving
the previously added module, the new module will be hidden behind the
other. You can move a module by dragging it by it's namebox. Figure
1 shows a simple annotated network that converts an image to a
greyscale image.
Modules have inputs and outputs. You can connect them by clicking
on an output box first, then clicking on an input box of the same
datatype (or vice versa). The type is shown in the input- and output
boxes. You can remove a connection by right-clicking on on input
box. An output box can be connected to several input boxes, but every
input can only receive data from one output.
Some modules have parameters that can be changed. You can do so by
selecting a module and choosing the Edit properties... option
from the Module menu, or from the menu that pops up when you
right-click on the name of a module. The properties of the output can
also be changed by right-clicking on the output box. The most useful
feature here is having the module display its output.
There will always be one module in your network that has no inputs:
the Image to Color module. It is the start of your network and
reads the input file to produce a Color (picture) output. Usually,
this Color output will be reduced to a Grey output (greyscale image)
because many of the modules work on greyscale and do not use color
information.
When you finish your network, it may be a good plan to save it
with the save options from the Network menu. You may want to
revisit an exercise later and it will save you the time to rebuild it.
Running pictures through a network
When you want to see what your network is doing, you need to select
one or more images to process by clicking the Select
basename... button in the main window. Once you selected the
image(s) you want to process, you can run the network.
You'll see the modules being highlighted as data passes
through. Images are processed sequentially, the entire network is
applied to one before the next one is processed. To see the output,
right-click on a module's output box to set it to display. You need to
do this before running the network. When you set an output to display
its results, the output box's bottomright marker turns black.
When a module's output is displayed, you can save the data to your
home directory (usually /home/isfer##). You can use secure copy to
send the file to a machine where you want to write your
report. Alternatively, you can e-mail it to yourself with a mail
program such as Mutt or Netscape's mailer. You can use floppies with
the mdir, mcopy etc. and eject
commands (see man pages for more information). You can also write your
report with LaTeX or StarOffice on our UNIX cluster.
Note that sometimes, you may want to use other modules to see
what's going on if the modules in an exercise do not provide
enough information for your taste. Feel free to use any other modules;
the modules shown in the exercise are the minimum needed.
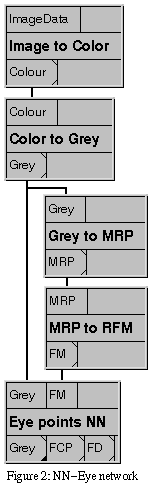
Exercise 1: the NN-Eye network
The goal of this network is to locate the eyes and especially the
microfeatures in the eyes. These microfeatures are the location of the
eye corners, joints between pupil and eye lids and the center of the
pupil. Using the relative positions of the microfeatures, the possible
emotions expressed by the eyes can be classified.
First, the image is converted to a greyscale Multi Resolution
Pyramid in two steps. Then, the MRP to RFM module is used to
find a rough estimate for the location of the eyes (and other facial
features), contained in a Raw Feature Map (the RFM datatype). Then,
the RFM is used by the Eye points NN network to determine the
microfeatures.
The details of how the MRP to RFM and Eye points NN
modules work is described in the paper handed out in class [1].
Exercise
Construct the network shown in figure 2 and process the following
images with it:
- nneye01.gif
- nneye02.gif
- nneye03.gif
When selecting the images with the Select basename... button,
these pictures should be shown in the file browser. If not, change the
browser's directory to /home/isfer/demo/framework/Data.
Report your findings and try to explain any irregularities. Make
sure you look carefully at the results. Save and enlarge the pictures
(with XV or the Gimp) if necessary. You can use the Grey clip
module to visualize the RFM, which can be very useful.
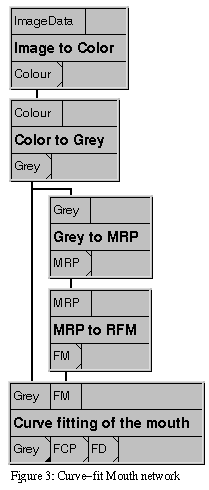
Exercise 2: the Curve-fit Mouth
network
The goal of this network is to approximate the contour of the
mouth. Using a simple yet fairly accurate model with only a few
parameters, it is easier to classify the emotion expressed by the
shape of the mouth. Here, we use two parabolas to approximate the
upper lip and one for the lower lip.
As before, the rough facial features are located and captured in a
RFM. We then feed the greyscale image and the RFM to the Curve
fitting of the mouth module.
The details of how the Curve fitting of the mouth module
works are described in the paper handed out in class [1].
Exercise
Construct the network shown in figure 3 and process
these images with it:
- curvefit01.gif
- curvefit02.gif
- curvefit03.gif
As with exercise 1, report your findings and try to explain any
irregularities.
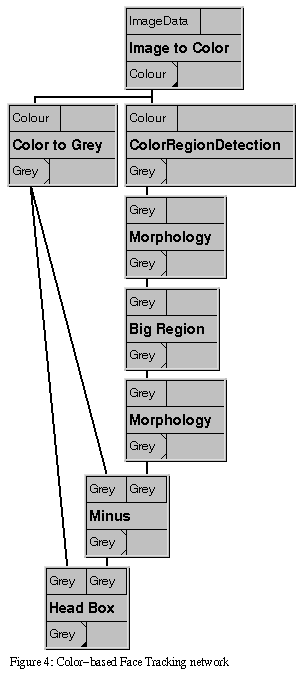
Exercise 3: the Color-Based Face Tracking network
The goal of this network is to separate the face from the rest of the
picture. This process of distinguishing objects from the background is
called segmentation. In this case, we only want the face in a
bounding box with everything outside the box removed and we want the
segmentation to be color-based, using the color difference between the
skin and other objects in the image.
For this network, we don't throw away the color information before
using it. The ColorRegionDetection (CRD) module uses the color
to select parts of the image that fall within a certain color
range. The output is a bitmask disguised as a greyscale picture so
that it can be viewed.
This output is then filtered through a Morphology module,
which can be used to remove noise from the bitmask. The largest object
in the filtered bitmask is then selected by the Big Region
module. This new bitmask is again filtered by a Morphology
module. The final filtered bitmask is then used by the Minus
module to hide parts of the picture that are not in the bitmask, which
should be the same as the skin.
Since we are interested in the entire face and not just the skin,
we use the Head Box module to show the smallest rectangular
area around the skin.
Description of module parameters
The CRD module selects pixels with colors that match a range of colors
defined by the parameters of the module. The Colour datatype
contains a color image with the colors represented by a vector in the
well-known RGB colorspace. The CRD module operates on color vectors in
the Hue Saturation Value (HSV) colorspace and converts the RGB
vector to an HSV vector before deciding if the color is accepted.
In HSV space, each color is represented by a vector with three
components: hue, saturation and value. Hue defines the "basic" color
as an angle in the spectrum ranging from red to green to blue, and
back to red again. Values range from 0 to 360 degrees. Saturation
ranges from 0 to 1, where 0 always yields no color at all (greyscale)
and 1 yields a fully saturated color. Value is the "brightness" of the
color, ranging from 0 (black) to 1 (maximum brightness). For more
information on the HSV model, see the brief description with a nice
colorwheel showing hue and saturation at Project Cool [2] and the explanation on the SigGraph site [3].
The range of colors that are accepted is now defined by the
intersection of the acceptable ranges for each of the HSV
components. The CRD module uses five parameters for this. The simplest
parameter is the Threshold of value. This is the minimum value
of the Value component. If it is lower (meaning the color is too
dark), it is not accepted.
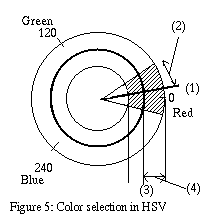
The range for the hue and saturation are defined by a center and a
radius for each (figure 5). The center specifies the middle of the
range and the radius the width of the range. The term "radius" for the
width of the range should not be confused with the width of the
circles in the picture. The circle in figure 5 is the same as the
colorwheel in [2].
The Center of hue (1) and Radius of hue (2), both in
degrees, define a pie piece from the colorwheel. The Center of
saturation (3) and Radius of saturation (4) define a ring
of acceptable saturation levels on the colorwheel. The final accepted
range is the intersection of the pie piecce and the ring.
The Morphology module is used to remove noise from the
bitmask. It does so by using two techniques, which are applied several
times in a row: first, it uses a process called dilation to
make objects in the mask "thicker". This solidifies thin lines that
connect objects, and fills holes in objects. Then, it uses a process
called erosion which erodes objects in the mask. This removes
thin edges and small objects from the bitmask. Each Morphology module
performs two rounds of dilations and erosions (the first round of
dilations, the first round of erosions, then a second round of both in
the same order).
There are five parameters for every morphology module:
- Size of mask is the size of the mask used for each
iteration. The larger the mask, the larger the area affected by each
iteration.
- Nr of first dilation and Nr of second dilation are
the number of subsequent dilations performed for the first and the
second step.
- Nr of first erosion and Nr of second erosion are
the number of subsequent erosions for the first and the second step.
Exercise
Contruct the network shown in figure 4, and process the following
images:
As before, describe the results and try to explain oddities. You will
notice that the network does not perform very well for the second
picture. Change the parameters of any modules necessary to get a good
picture in the headbox. You can use any tools (including modules) you
like to examine or analyze the picture, but the end result should be
achieved with this network configuration and the original image only.
One particularly useful tool is XV, since it has a color editor
that can show you the actual HSV values. You can start XV by including
the XV module in your network, or you can start it from a shell.
In your report, make sure to describe what you did to get to your
final result and why you did it that way. Also include the module
settings you used to achieve that result.
Report
Your report will be used to determine how well you understood the assignment.
The grading is based on several criteria including, but not limited to:
- The quality of the descriptions and explanations requested for
each exercise. Describe things clear, correct and complete.
- The use of pictures. A picture speaks a thousand words; use them
when necessary, make sure they are of decent quality, that it is clear
what the pictures are, and refer to them in your text.
- While not as important, style can adjust your grade upwards or
downwards. Think about your setup and layout. It is easier to read
and understand a well-written, good looking report than a poorly
worded, messy report. Do not leave things out, assuming that the
reviewer will understand. Be explicit. Show that you know what you
are doing.
References